
Increase Logging Details
Discover how Pleasant Password Server will enhance KeePass for business
To see more detailed logging information, follow the steps below.
-
Have Questions? Contact Us!
Step 1: Increase the Detail Level
- Increase the level of detail in one or more of the following configuration files.
- Note: locations may be in hidden folders
Server Logging
- Versions 7+:
- Open this file (with Admin privileges):
- %ProgramFiles(x86)%\Pleasant Solutions\Pleasant Password Server\www\web.nlog
- Uncomment or Add the following line, just below the <rules> tag or just above the closing </rules> tag (at the bottom of the file):
<logger name="Pleasant.Identity.*" minLevel="Trace" writeTo="bufferedFile" />
- Output will go to the Web logs & Server logs:
- %ProgramData%\Pleasant Solutions\Password Server\WebLogs.txt
- %ProgramData%\Pleasant Solutions\Password Server\PleasantPasswordServerLog.txt
- Open this file (with Admin privileges):
- Versions 6 and older:
- Open this file (with Admin privileges):
- %ProgramFiles(x86)%\Pleasant Solutions\Pleasant Password Server\www\web.config
- Uncomment or Add the following line, just below the <rules> tag or just above the closing </rules> tag (at the bottom of the file):
<logger name="*" minLevel="Trace" writeTo="rollingFile" />
- Output will go to the Web logs & Server logs:
- %ProgramData%\Pleasant Solutions\Password Server\WebLogs.txt
- %ProgramData%\Pleasant Solutions\Password Server\PleasantPasswordServerLog.txt
- Open this file (with Admin privileges):
KeePass For Pleasant Logging
- Open this file (with Admin privileges):
- %ProgramFiles(x86)%\Pleasant Solutions\KeePass for Pleasant Password Server\NLog.config
- We will need to increase from "Error" to "Trace" level logging.
- Modify or uncomment the following line, just above </rules>, at the bottom of the file:
<logger name="PasswordServer*" minLevel="Trace" writeTo="rollingFile" final="false" />
- Output will go to the KeePass for Pleasant logs:
- %AppData%\Roaming\PleasantKeePass\KeePasslog.txt
Email Logging
- Note: Administrators can also diagnose further with the Email Troubleshooting instructions
- Open this file (with Admin privileges):
- %ProgramFiles(x86)%\Pleasant Solutions\Pleasant Password Server\www\web.nlog
- Change the line from this:
- <logger name="Pleasant.Net.Mail.*" minLevel="Error" writeTo="bufferedFile" />
- To this:
<logger name="Pleasant.Net.Mail.*" minLevel="Trace" writeTo="bufferedFile" />
- Output will go to the Web logs:
- %ProgramData%\Pleasant Solutions\Password Server\WebLogs.txt
Syslog Logging
- Open this file (with Admin privileges):
- %ProgramFiles(x86)%\Pleasant Solutions\Pleasant Password Server\www\web.nlog
- Uncomment the following line just above </rules>, at the bottom of the file:
<logger name="SysLogLogger" minLevel="Trace" writeTo="bufferedFile"/>
- Output will go to the Web logs:
- %ProgramData%\Pleasant Solutions\Password Server\SysLog-Log.txt
Performance Logging
Performance Logging was added in version 7.7.2.
- Also increase the above Server Logging
- Open this file (with Admin privileges):
- %ProgramFiles(x86)%\Pleasant Solutions\Pleasant Password Server\www\web.nlog
- Uncomment the following line just above </rules>, at the bottom of the file:
<logger name="PerformanceLogger" minLevel="Trace" writeTo="bufferedFile"/>
- Output will go to the Web logs:
- %ProgramData%\Pleasant Solutions\Password Server\WebLogs.txt
RDP SSO Logging
For Enterprise+SSO editions.
- Open the file PassMan.Proxy.Rdp.Worker.exe.nlog (with Admin privileges) in these locations:
- %ProgramFiles(x86)%\Pleasant Solutions\Pleasant Password Server\
- %ProgramFiles(x86)%\Pleasant Solutions\Pleasant Password Server\www\bin\
- Add the following line just above </rules>, at the bottom of the file:
<logger name="PassMan.Proxy.Rdp.*" minLevel="Debug" writeTo="bufferedFile" />
- Output will go to the RDP SSO logs:
- %ProgramData%\Pleasant Solutions\Password Server\PleasantRdpProxyLog.txt
Step 2: Restart the Service
Step 3: Retry
- Retry the operation causing the error
Step 4: View Log Details
Step 5: Send your Logs
- Send log files via email to Support for further diagnostics
Once you are finished troubleshooting, you can restore the original log settings, which take effect upon service restart.
Our support team may be able to suggest a more exact change to enable logging in the specific area causing issues.
View Log Details
Administrators can review any error details and can send these details on to Support for further diagnosis. Start with the Web logs which contains the most information, and then the Server logs.
Please: Do not share your .db file
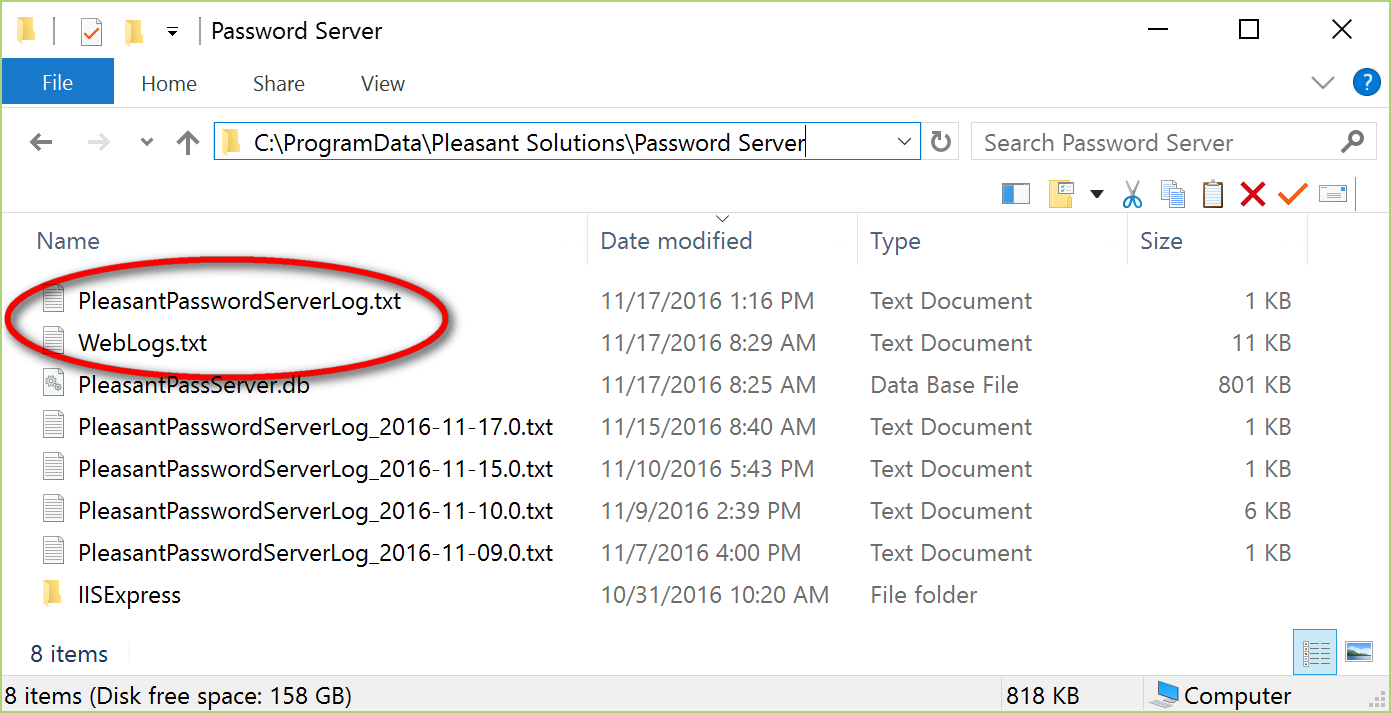
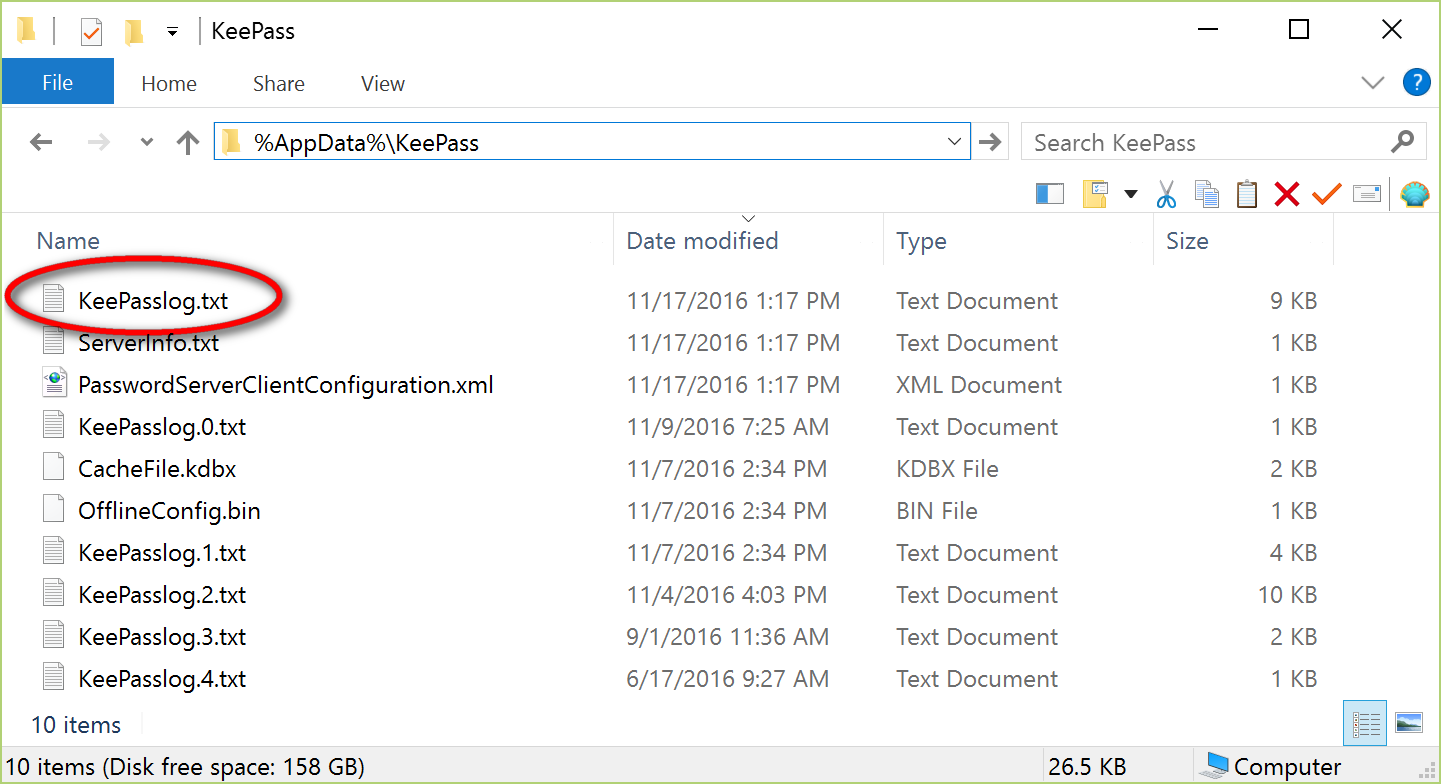
Most Recent Files: Share the most recent log file will have no number or date suffix:
For example, .1., or, _2016-11-17
- Hidden Directories: These directories may be hidden by default, but can be accessed by entering
%ProgramData% or %AppData% in the directory path.
Server and Web Client
On Pleasant Password Server machine:
- Web log: %ProgramData%\Pleasant Solutions\Password Server\WebLogs.txt
- Server log: %ProgramData%\Pleasant Solutions\Password Server\PleasantPasswordServerLog.txt
KeePass for Pleasant Client
On KeePass for Pleasant desktop machine:
- KeePass for Pleasant log: %AppData%\KeePass\KeePasslog.txt
RDP SSO
On Pleasant Password Server machine:
- RDP SSO log: %ProgramData%\Pleasant Solutions\Password Server\PleasantRdpProxyLog.txt